Course Builder enables you to interact with your course materials, learning activities and assessments in one area so you can visualize and review your entire course at once. Whether you’re starting from scratch or updating existing courses, Course Builder is an excellent tool for planning and organizing course materials.
Due to its Drag and Drop functionality, Course Builder is particularly useful when you wish to rearrange the order of content within your course.
To access Course Builder from the Course Home page, click on Course Materials on the navigation bar and select Course Builder from the dropdown menu.

Course Builder in the Learning Environment
As you build your course, Course Builder interacts with the following Learning Environment tools:
- Content
- Manage Files
- Discussions
- Assignments
- Quizzes
- Grades
Course Builder Terminology
Node
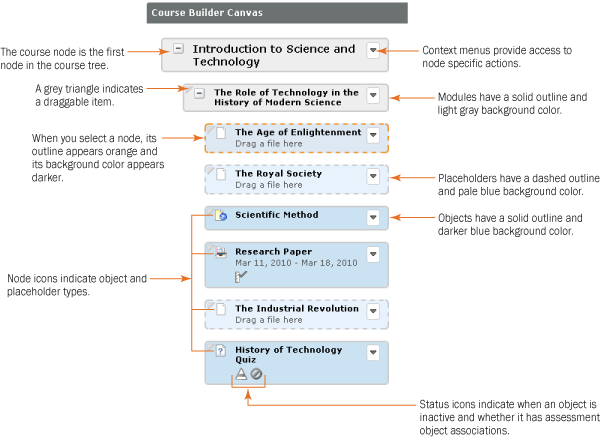
Each structure element in the course tree is called a node. Node is a general term that can represent a module, placeholder, or object.
Modules
A module is an organization element that can represent different chapters, units, or sections of your course. You must create a module in Course Builder before you can begin adding objects and placeholders.
Placeholders
A placeholder is essentially a container for an object. It is not visible to learners until you add an object to it. There are five placeholder types: link, file, discussion, assignment, and quiz.
Placeholders help you define the structure of your course before you are prepared to compile actual course content. This enables you to plan your lectures, discussion topics, assignments, tests, and other course activities before you begin creating them.
You can populate placeholders when you are ready by creating new content or linking to existing content. For example, if the completion of a particular course unit depends on acquiring files from another resource, drag placeholders into the course tree to represent those files until you receive them.
Objects
Objects are simply learning materials, activities, or assessments in your course. Object types include: links, learning objects, HTML files, discussions, assignments, quizzes, grade items, and learning objectives.
When you create an object in Course Builder, you are in effect creating it within its respective tool and adding it to your course content. For example, when you drag a quiz object into the course tree from Add Content, Course Builder prompts you to enter its basic details and creates the quiz in Manage Quizzes. At a later time, you can go to Manage Quizzes to edit advanced quiz properties and add questions.
Understanding Nodes and the Course Tree
The course tree represents course content as a hierarchy of nested nodes. The appearance of each node denotes its type, the object type it holds, and the actions you can perform on it.
The first node in the course tree is the course node. When selected, you can change your course offering information in the selected node panel.
Course Builder Interface Overview
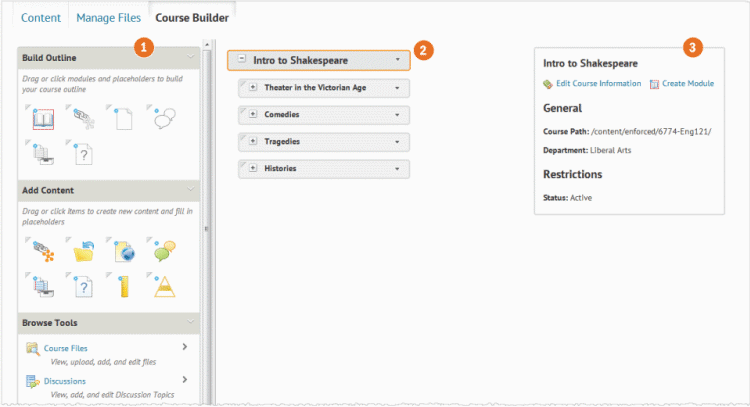
1) Toolbox
You can add modules, placeholders, and objects to the course tree from three areas within the toolbox: Build Outline, Add Content, and Browse Tools.
Build Outline provides you with module and placeholder elements that you can add to your course tree to create your course outline.
Add Content provides you with a selection of objects you can create and add to the course tree or drag onto placeholders in the course tree. Direct access to object types within Course Builder enables you to bypass the complexity of setting up objects in their individual tool areas. You can create and add the following objects to the course tree:
- Links
- HTML files
- Discussion topics
- Assignments
- Quizzes
- Learning objectives
- Existing learning objects from Brightspace Learning Repository
Browse Tools displays a library of pre-existing objects in your course tools. From Browse Tools, you can locate and add these pre-existing objects to the course tree or drag them onto placeholders in the course tree. This section of the toolbox features a drill-down menu with breadcrumb links that appear at the top of the toolbox as you navigate deeper into the menu. You can click on breadcrumb links to return to a previous section.
2) Course Tree
The course tree is a visual representation of your course structure. It displays the hierarchy of your course content as a series of nested nodes. The course tree simplifies the process of rearranging, copying, and deleting your course structure.
Each structure in the course tree is called a node. Node is a general term that represents a module, placeholder, or object.
Each non-module node in the course tree includes an icon indicating its type. This can help you to see what’s in your course at a glance.
3) Selected Node Panel
When you select a node in the course tree, the selected node panel displays its details and enables you to perform actions on that node. From the selected node panel you can:
- View general properties for an object
- Edit placeholder properties to change the display name or add planning notes
- Edit object properties
- Launch an object’s associated system tool
- Perform node-related actions
The Relationship Between Course Builder and Content
As you add modules, placeholders, and objects to the course tree, Course Builder synchronizes with various tools within Brightspace, including the Content tool.
The way Course Builder interacts with the Content tool depends on what you add to the course tree:
- When you add a module to the course tree, the system generates a content module which appears in the Content tool.
- When you add a placeholder to the course tree, the system generates an empty content topic. This content topic is hidden from the Content tool until you attach an object to the placeholder.
- When you add an object to the course tree, the system generates a content topic. This content topic is visible in the Content tool. If you edit an object’s placeholder name or notes within Course Builder, you are editing the name and shared designer comments of the corresponding content topic within the Content tool.
To see how Course Builder content displays for learners, from the tool navigation, access the Content area.
Creating a Course Structure
Add a Module or Placeholder
- On the navbar, click Course Admin.
- Click Course Builder.
- From the Build Outline section of the toolbox, do one of the following:
- Drag a module or placeholder into the course tree in the location you want.
- Click on a module or placeholder element. From the Select a location dialog, click on the location you want to add your module or placeholder.
- Enter the module or placeholder details.
- Click Create.
Add A New Object
When you create an object in the toolbox or drag a new object into the course tree, Course Builder interacts with its tool, enabling you to populate basic information and attributes. This streamlines the process of setting up your resources so you can focus on developing your course. From the toolbox or selected node panel, you can launch an object’s corresponding tool to complete and finalize its details.
- On the navbar, click Course Admin.
- Click Course Builder.
- From the Add Content section of the toolbox, do one of the following:
- Drag an object type into the course tree in the location you want.
- Click on the object type you want to create. From the Select a location dialog, click on the module or placeholder you want to add your object to.
- Enter the object details.
- Click Create.
Add an Existing Object
- On the navbar, click Course Admin.
- Click Course Builder.
- From the Browse Tools section of the toolbox, locate the existing object you want to add to your course.
- Do one of the following:
- Drag the object you want to add to your course into the course tree in the location you want.
- Select the check box beside the object you want to add to your course structure and click Add to Course. From the Select a location dialog, click on the module or placeholder you want to add your object to.
Add a New Evaluation Object
After adding activity objects (discussions, assignments, and quizzes) to your course structure, you can associate them with evaluation objects (grade items and learning objectives). If an evaluation object is already associated with an activity, that association appears in the evaluation object’s details when you browse objects. At the same time, an activity object displays grading details when it is associated with an evaluation object.
- On the navbar, click Course Admin.
- Click Course Builder.
- From the Add Content section of the toolbox, do one of the following:
- Drag an evaluation object type onto a discussion, assignment, or quiz in the course tree.
- Click on the evaluation object you want to create. From the Select a location dialog, click on the discussion, assignment, or quiz you want to add your evaluation object to.
- Enter your evaluation object’s details.
- Click Create.
Add an Existing Evaluation Object
- On the navbar, click Course Admin.
- Click Course Builder.
- From the Browse Tools section of the toolbox, locate the existing grade item or learning objective you want to add to your course.
- Do one of the following:
- Drag the evaluation object you want onto a discussion, assignment, or quiz object in the course tree.
- Select the radio button beside the evaluation object you want and click Add to Course. From the Select a location dialog, click on the discussion, assignment, or quiz object you want to add your grade item or learning objective to.
Repair Broken Objects
Deleting or moving files, links, discussions, assignment submissions folders, and quizzes within their tools can result in broken objects. If an object breaks, Course Builder displays a broken link status icon within its node. The object becomes a placeholder retaining its name and notes.
To repair a broken object, drag an object from the toolbox onto the placeholder.
Back to top of page